Beef Tortilla Soup

I know. It’s June and I live in Louisiana. You’re asking yourself, “Why on Earth is Christen cooking soup in June in Louisiana?” I get it. A lot of people do not eat soups when it’s hot out. My theory on that is that I still drink coffee when it’s hot out. I still eat warmed up spaghetti, jambalaya, etc.

So yeah, I made soup today, on Father’s Day. My husband wasn’t feeling great. I’m choosing it was not my driving on the way to go see Maverick that caused him to have motion sickness. It was definitely the dare-devil flying that ol’ Maverick was getting up to. Not my driving. Regardless, I decided to make soup and wanted something different. I was trying to find a copycat recipe from the tortilla soup at Texas Land and Cattle, but was not successful. I did find this recipe that’s a copycat of the soup at the Menger Hotel in San Antonio. I’ve never had it, but it seemed easy enough.

The verdict was that it was both easy enough AND freaking fantastic! I just so happened to have some smoked/roasted poblano peppers, which really helped with the easy part. I’ll have to make sure that I just happen to have those on hand for next time! Seriously though, this was like if tortilla soup and taco soup had a love child. Perfect mix. Make it, because I doubt I’ll be sharing! lol

Beef Tortilla Soup

Beef Tortilla Soup
Recipe adapted from Urban Cowgirl Life

Ingredients:
1 lb. lean ground beef
1 tbsp olive oil (give or take)
generous sprinkle of favorite seasoning – I use Holy Voodoo
1 onion, diced
2 smoked or roasted poblano peppers, seeds and stems removed
4 cloves minced garlic
6 oz. tomato paste
1 can fire-roasted diced tomatoes
1/2 tbsp oregano (I added a few shakes of Green & Red Hatch Chili Flakes from Trader Joe’s)
1/2 tsp cumin
1 tsp. Mexican hot chili powder
2 quarts beef stock
2 tbsp cilantro, chopped
1/2 tbsp Kosher salt
1/2 tsp pepper
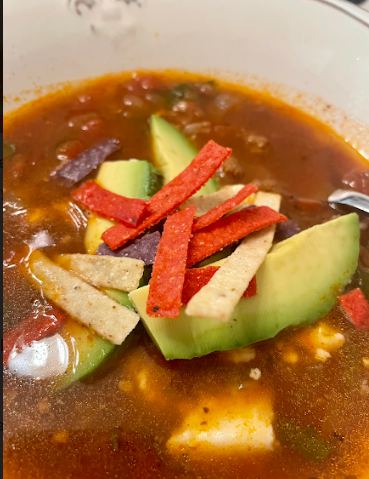
Toppings: sour cream, queso fresco, avocado, tortilla strips, whatever the heart wants…

In a large soup pot with a lid, heat about a tbsp of olive oil over medium heat, then add your ground beef. Begin to brown it, seasoning with your favorite seasoning (I like Holy Voodoo, you can just use salt if you want). As the meat cooks, break it up into small pieces with your spoon. Once the meat is browned, add your onions, cover with the lid, and cook for a few minutes until soft. If you are using fresh (as in not smoked or roasted) peppers, you can add them at this point as well to make sure they get soft. Once the onion is soft, add the roasted poblano pepper and garlic, cook for another minute or so until fragrant. Add your can of diced tomatoes. I like to let this cook for a few minutes so I can pick out the tomato skin. You don’t have to do that, but that’s just me. Cook for about five minutes.

Add the cumin, chili powder, oregano, salt, and pepper. Stir well to combine. Stir in the tomato paste until fully mixed in. Cook for a minute. Stir in the beef stock, then add the cilantro. Cover and cook over medium heat at least 20 minutes, but you may let simmer for a while.

Serve with your favorite garnish.


Biscochitos

For summer vacation, my family decided to take a driving tour of New Mexico. It was sort of a last-minute pick when other options fell through. We absolutely fell in love with the state. The scenery was beautiful, everyone was nice everywhere we went, and the food was fantastic. I was even able to meet up with a fellow foodie friend from back in my often blogging days. On our last day in New Mexico, we ate at a fantastic little restaurant in Santa Fe, Casa Chimayo. I highly recommend going and trying their brisket stuffed sopapilla. Even their salsa was amazing. As we were paying, the owner (or maybe his wife?) gave us each a biscochito. These are the official state cookie of New Mexico, and I believe she said it was her grandmother’s recipe. It was delicious. It’s got a shortbread texture with a cinnamon flavor. I dreamed of it the rest of the (many) miles back to Louisiana.

Once we arrived home, I set about trying to make biscochitos. I tried several recipes and none were quite like hers. I ended up making a mix of recipes and being satisfied. I took some to a family reunion, sent some to my husband’s work (I made many batches of trials, so we had cookies coming out of our ears!). Fast forward to a couple of weeks ago, my daughter chose New Mexico as a state to research in her American Studies class. I’m telling you, we all fell in LOVE with that state! She asked if I would make biscochitos for her to bring for her classmates to taste. I sent four dozen to school and her class wiped them all out. Even though I haven’t blogged in forever (sorry, I’ve been busy!), I decided to commit this recipe to the blog so she can share with her friends and I can share with you guys.

Biscochitos (or Bizcochitos – either spelling works)

Ingredients:

2 sticks butter, cut into chunks (1 cup)
1 cup powdered sugar
1/2 teaspoon salt
1 teaspoon crushed anise seeds (I crushed them in a coffee grinder)
1 teaspoon butter vanilla emulsion
2.5 cups all-purpose flour
2 tablespoons brandy (if making for children and you want a clean conscious, use regular vanilla)
1/2 cup sugar and 1 teaspoon cinnamon mixed, for topping

Method:

Preheat oven to 300 degrees F. In a stand mixer (I use the scraper paddle), beat butter, sugar, and salt until well-mixed. Add butter vanilla emulsion (you can also find this at Hobby Lobby if you don’t have time to order online) and brandy. Mix in well. Mix flour and anise and allow to mix until blended.

On a floured surface, mix flour in with dough until not super sticky. Use a flour rolling pin to roll dough out and cut with cookie cutters. Place on a parchment-covered baking sheet and bake for 15 minutes. Once baked, place 1 cookie at a time in the bowl of cinnamon sugar and gently spoon sugar over. Dust off excess and allow to cool. Store in a tupperware at room temperature.

Whipped Coffee

Recently I’ve seen several online posts for whipped coffee. It looked intriguing, and I’m a coffee lover so I decided to look into how to make this interesting concoction. It took a few minutes to make but trust me, it was worth the time! I think I’ll still stick with my regular brewed coffee for work days, but this is a great treat for a weekend breakfast! I can’t wait to see if my husband likes it. He likes coffee alright, but doesn’t care much for hot beverages.

To serve, you simply place the whipped coffee atop some iced milk. It makes a good presentation! Before drinking, use a spoon and gently mix it all together and enjoy! Make sure to use instant coffee, I used just regular Folgers instant coffee.

Whipped Coffee

Whipped Coffee

Ingredients:

2 tablespoons of your favorite (lol) instant coffee
2 tablespoons white granulated sugar
2 tablespoons water
milk
ice

Method:

In a deep bowl, combine the instant coffee, sugar, and water. Beat with a hand mixer until soft peaks form. Make sure it is well blended.

Fill a glass (clear makes the best presentation) with a little ice, and fill to about 3/4 full of the milk of your choice. Carefully top with the creamy whipped coffee. Just before drinking, mix the whipped coffee and milk.

Creamy Shrimp Fettuccine

Since it’s been almost two years since my last post and we are living through a pandemic, I thought I’d post some new recipes.  It’s not like I have no time on my hands now.  I’ve actually made a lot of delicious things in the last couple of years but I’ve been so busy that we wind up eating late, which does not help with photography.  I find natural light works best for food.  Also, we moved and where my table is located does not have the best lighting.  I’ll find a way to make it work so I can go back to giving you guys some great recipes.

This recipe was an adaptation of a Cajun Ninja recipe.  His recipes are always delicious, but I adapted to suit my family, as well as what was available at the grocery store.  Some things can be hard to find right now!  This recipe makes enough for two pans of fettuccine, but I only needed one pan so I froze half of the sauce before adding the shrimp.  Now when I want to make it again, I can simply defrost the sauce, cook some shrimp and pasta and mix it together!  Winner winner, shrimp for dinner!

IMG_0770

Creamy Shrimp Fettuccine
Recipe adapted from Cajun Ninja

Ingredients:
2 lbs. shrimp, peeled/deveined (I used one pound and will do another when I use the frozen sauce)
1 tsp. garlic salt
1 tbsp. Creole seasoning
1 cap of liquid crab boil (use 1/2 cap if only cooking one lb of shrimp)
1 tbsp olive oil
1 onion, chopped
1 bell pepper, chopped
2 sticks of salted butter
2 tsp minced garlic
1 can Mild Rotel
1 can Cream of Chicken (I used heart healthy and it was fine)
1 can chicken broth
1 pint half and half
16 oz. block Velveeta, cut into cubes
2 packs (12 oz) Fettuccine noodles, cooked (use one pack if only cooking one pan)
2 9×13 casserole dishes or aluminum pans.

Method:

Preheat oven to 350 degrees F.

Prepare the shrimp:  In a small bowl, combine the peeled shrimp with the crab boil, garlic salt, Creole seasoning, and set aside.  If you are freezing half your sauce you will use 1 lb. of shrimp with half a cap of crab boil.  If you are cooking two pans, you will use two pounds of shrimp with the full cap of crab boil.

Cook the sauce:  In a large pot, melt the two sticks of butter.  Once melted, add your onion, bell pepper, and garlic.  Cook until the vegetables are softened, about 20 minutes.  Next, add the Rotel and combine well.  Stir in the Cream of Chicken, chicken broth, and half and half.  Allow to heat through, then slowly add the Velveeta, stirring to combine fully.

Cook the shrimp:  In a small pot, heat olive oil and add the shrimp.  Cook, flipping until just pink.

Combine and Bake:  At this point, if you are going to freeze half of your sauce, use a measuring cup or ladle and spoon half of it into a bowl to cool.  Add the shrimp to the remaining half.  If you are making the full batch, you will be adding in two pounds of shrimp to the full pot of sauce.  If you are freezing half of your sauce, you will be adding 1 pound of shrimp to the sauce still in the pot.  Mix with pasta (either one pack or two, depending on how much you are making).  Put into casserole dish(es) greased with cooking spray and cover with foil.  Bake for 20 minutes.

Dig in:  Allow to cool for a few minutes and serve hot with salad and garlic bread.

IMG_0775

Caponata

Though caponata is a Sicilian eggplant appetizer, a dip to serve with crackers, I automatically think of hurricane season when I think of it.  Why?  My family has always canned it, making it an easy snack when power is out during a hurricane!  I guess another reason is that summer is when eggplant are plentiful, making this the best time to cook this fabulous concoction.

Though we can and process this dip into jars, you certainly do not have to.  It does make a lot, much more than you would typically use for a regular party so I’d suggest either canning some, or being the best neighbor ever with some little summertime “thinking of you, neighbor” gifts!  Bonus perk – this is a microwave recipe (except for the processing of jars if canning).


EEE8A066-344A-4734-B6FC-EE306E522546

Eggplant Capanata

Capanata
Makes 2 Quarts
Recipe slightly modified from Tout de Suite a la Microwave

Ingredients:
3 cups onion, chopped
1.5 cups green bell pepper, chopped
1.5 cups celery, chopped
1/2 cup olive oil
2 large eggplants, peeled and cut into cubes (I like them on the smaller size, .5″) – soak in salt water 20 minutes then drain
1 (8 oz) can tomato sauce
1 (6 oz) can tomato paste
5 cloves garlic, minced
1 (6 oz) can pitted black olives, sliced
1/2 cup pitted green olives, sliced or halved
1/2 cup red wine vinegar
3 tbsp sugar
1.5 tsp. oregano
1 tbsp salt
1 tsp. cayenne pepper
1 tsp. pepper

Method:

In a 4 quart microwave-safe bowl or casserole, mix together onion, bell pepper, and celery with olive oil.  Cover with wax paper and cook on HIGH 30 minutes.  Stir halfway through.

Stir in eggplant, cover and cook on HIGH 30 minutes, stirring halfway through.  Add tomato sauce and tomato paste, mix well, and cook on HIGH 10 minutes.

Stir in garlic, olives, vinegar, sugar, oregano, salt, and pepper.  Cook on HIGH 5 minutes.  Serve chilled.

Note:  if canning, start with hot caponata.  Boil glass jars in large canning pot, with the lids in a small pot of water on simmer.  One at a time, remove a jar from the water, drain, set on counter with the canning funnel in the opening.  Fill till about halfway up into the opening of the jar, tap or use a butter knife to ensure no air pockets.  Carefully remove funnel, be CERTAIN that the top is CLEAN, then carefully apply one of the lids that was in the simmering water.  Close with the jar’s ring until just tight, but not super tight.  Once all jars are filled, place back in boiling water in canning pot, be sure that water is covering all jars,  Boil for 15 minutes.  Remove jars and set on a cutting board or towel and allow them to cool off.  You’ll hear a “pop” noise as they set, showing that they have processed correctly.  Store in the pantry until ready to serve.

9F177573-2665-4F5E-BBFC-04184BE75A0B

I made 7 half pint jars, with some extra for snacking!

Muffuletta Pasta Salad

Muffuletta or Muffaletta?  Central Grocery in New Orleans goes with the U so that’s what I’ll do too.  Anyway, this isn’t about that amazing, gigantic sandwich that they created.  While I’ll eat a sandwich, it’s not my favorite type of food.  I’m all about the pasta.  So when my family was coming spend the weekend, I thought a cold muffuletta pasta salad would go perfectly with the simple sandwiches we had planned.

My dad and brother REALLY enjoyed the pasta salad, so really this post is for them, so I don’t forget what I did and can make it again.  It was really simple and easy to throw together.  Cook the tortellini in advance (it only takes 3 minutes) so it can chill before mixing the rest of the ingredients.  Perfect for a hot summer gathering!  I used sliced salami and pepperoni, I think a link that you could dice would work better, but use what you have on hand!

IMG_6027

Muffuletta Pasta Salad
A Christen Original

Ingredients:

2 packages frozen cheese tortellini, cooked and chilled
1/2 jar olive salad mix
Italian dressing
fresh mozzarella balls, quartered
pepperoni, diced
salami, diced
Optional:  grated parmesan cheese

Method:

In a large bowl, toss together the tortellini and a little Italian dressing, until just coated.  There’s no measurement for this, just eyeball it.  Once coated, add the olive salad mix, mozzarella, pepperoni and salami.  Toss to mix well.  Refrigerate until ready to serve.


Christen’s Mojitos

If you haven’t had the pleasure of visiting Louisiana in the summer, I’ll let you in on a not so secret fact:  it’s hot.  So hot.  Recently I attended a little get-together that was outdoors.  Despite the outdoor temps, the heat wasn’t so bad because there were some fans blowing on us as we drank mojitos poolside.

Have you ever had a mojito?  Well this was my first time indulging in this delight and delightful it was!  It’s got a fresh flavor without being overpowering in the mint taste or the sweetness.  A few weeks later I looked up some recipes online and started practicing to create what I think it a pretty darned good mojito!  Whip some of these up next time you are celebrating with friends, cooling off after yard work, or enjoying a Thursday evening!

IMG_5980

Christen’s Mojitos
Serves 2

Ingredients:

10-15 mint leaves
1.5 oz. simple syrup
1 oz. lime juice
4 ounces white coconut flavored rum (Malibu)
3 oz. club soda (1.5 oz. for each glass after pouring)
ice
fresh fruit for garnish (I used blueberries and raspberries just because they are pretty)

Method:

In a cocktail shaker, muddle the mint leaves well.  I find they muddle best if you add just a splash of rum in with them.  It doesn’t count towards your four ounces!  After mint is well-muddled, add the simple syrup, lime juice, rum, and ice.  Cover and shake well.

Pour (unstrained) into glasses over ice.  Add 1.5 ounces of club soda to each glass, stir, and garnish with fresh fruit.  Enjoy.

Note:  You can multiply this recipe by however many servings you need and put in a pitcher.

Instant Pot Chicken, Shrimp, and Andouille Gumbo

Let me start off by saying if you are still following me – thanks!  Over the last couple of years I went back to school for a degree in Early Childhood Education.  I graduated in the spring and began teaching third grade this past fall.  It has been a whirlwind!  I often find myself trying to figure out where I found recipes that I tried and liked – and I haven’t been blogging so they weren’t here!  The travesty!  Therefore, my new years resolution is to return to blogging recipes I try.

If you have a connection to the internet, then you know about the gadget that is sweeping the nation – the Instant Pot.  I’d been hearing about these for the last year or so but just got one for myself during the holidays (I got the CrockPot brand and I love it!).  I’ve only made a few things in it, but last night’s recipe was the one that I wanted to use as my return to you guys.  We had our second snow day in a little over a month, and when we have cold weather I feel like I have three options:  soup, chili, or gumbo.

This recipe for Instant Pot gumbo sounded pretty tasty so I gave it a try.  It was delicious!  I did find it to be a bit salty so my modified recipe will reflect changes for that.  I was not sure if it was because I used andouille sausage from a meat market (it looked very seasoned) or that it just called for too much Creole seasoning.  I’m going to cut the amount of Creole seasoning in half – you can always add more but cannot take it out once it’s done!  This recipe cooked very quickly and was delicious!

Chicken, Shrimp, and Andouille Gumbo

Instant Pot Chicken, Shrimp, and Andouille Gumbo
Modified from Stay Snatched

Ingredients:
6 oz. chicken breasts (I used half of a deboned, shredded rotisserie chicken from Sam’s)
1 lb. medium to large raw shrimp, peeled
1 link andouille sausage, cut into bite size rounds
1/2 green bell pepper, diced
1/2 yellow onion, diced
1 stalk celery, diced
1 pkg. frozen chopped okra, thawed
1 tbsp minced garlic
2 tbsp Better Than Bouillon chicken base
1 can chicken broth
2 tbsp olive oil
4 tbsp butter
4 tbsp all-purpose flour
3 cups water
1/2 cup diced tomatoes
a few drops of Liquid Smoke
1 bay leaf
1 tsp dried basil
1 tsp dried oregano
1/2 – 3/4 tsp cayenne pepper (to taste)
1.5 tsp Tony’s Creole Seasoning
1/2 tsp dried thyme
1 tbsp Worcestershire sauce
Salt and Pepper, to taste

White Rice for serving

Method:

With the Instant Pot on the Saute’ setting, brown the andouille sausage for two to three minutes, until browning.  Remove and set aside.  Add the butter and 1 tbsp olive oil.  Once the butter has melted, slowly stir in the 4 tbsp of flour.  Stir constantly, being sure to get the corners of the pot.  This is your roux and it should be around the color of a brown paper bag.

Once browned, switch to the Keep Warm setting and add your onions, bell peppers, and celery.  Stir well, cooking until the vegetables are tender.  Next, add all of the seasonings (not the liquid smoke), the minced garlic, and the Worcestershire sauce.  Stir well to incorporate. Add the chicken broth, okra, Better Than Bouillon, and 1 cup of water, stir well.  Return the sausage and the shredded chicken (or raw chicken breasts) to the pot and top with the diced tomatoes.  DO NOT STIR.  The tomatoes should always be at the top.

Close the pot and seal, cook on the Soup setting at High Pressure for 15 minutes.  Allow the pressure to naturally release for 10 minutes before releasing the pressure and carefully opening.  If your chicken was raw, shred it.  Otherwise stir well and add the shrimp.  Set the pot setting back to Saute’ and cook for a few minutes until shrimp are pink.  Put a few drops of liquid smoke and add remaining two cups of water to thin it out some, if desired.  Switch back over to Keep Warm.  Taste for seasonings and serve hot over rice.


Crawfish Etouffee’

If you grew up in southern Louisiana as I did, crawfish etouffee is a traditional dish that is prepared fairly often – especially during crawfish season (which generally runs from January through May or June).  Any Cajun cookbook you come across will have some version of the recipe and I’m sure people would love to debate what makes a true etouffee.

I spotted this recipe on Facebook a while back and have made it several times.  I have to say, it’s my favorite etouffee recipe I’ve come across.  It is creamy and the flavors are just on point.  It uses some unusual ingredients but it comes together to create pure magic.  In the recipe I will post, I’ve scaled back on some of the seasonings because we generally use crawfish leftover from a boil, which are already pretty well seasoned.  My husband made this once using those crawfish and the full seasonings and whew!  I was “glistening” while eating it!  So just give it a taste test and if you feel like it needs more seasoning, just add a little more of the steak seasoning or some cayenne powder (which it calls for but I leave out).

**A couple of notes:  It seems strange to put steak seasoning in but trust me, it makes a great flavor profile!  Also do not use a straight cast iron pot as it will discolor the crawfish.  Enameled cast iron is what I use.

crawfish etouffee

Crawfish Etouffee
Recipe adapted from Lou Wanna Parra on Facebook

Ingredients:

2 lbs Peeled Crawfish (Do not rinse crawfish, leave fat on)
1 stick Butter
1 Onion (Minced)
1 tsp Minced Garlic
2 stalks Celery (Chopped)
1/2 Bell Pepper (Chopped) (Optional)
3/4 Capful Liquid Crab Boil (small bottle size)
1 tsp Garlic Powder
1.5 Tbsp Texjoy Steak Seasoning (this sounds strange but trust me!)
Dash of Salt, Black Pepper
1 Can (10.5 oz) Golden Mushroom Soup
1 Can (10.5 oz) Cream of Celery Soup
1 Capful of Kitchen Bouquet (small bottle size)
Parsley Flakes
1/2 to 1 Soup Can of Water

Method:

In a 5 qt. pot, place your stick of butter, then on top add the onions, garlic, celery, and bell pepper.  Top with the peeled crawfish (you’re supposed to make a pyramid but that doesn’t seem to work for me so don’t sweat it).  Add the liquid crab boil, garlic powder, TexJoy seasoning, salt and black pepper on top of the “pyramid”.  Don’t stir it yet.  Place the lid on top and cook over medium heat until the vegetables are soft.  Once they are softened, stir well, then add the mushroom soup and celery soup, plus the water.  Stir well to incorporate ingredients.  Add the Kitchen Bouquet and stir in well until evenly blended.

Cover and simmer over low heat at least ten minutes.  Serve warm over rice.

Chicken and Vegetable ‘Lo Mein’ Fake Out

Calm down, your eyes are not deceiving you.  This really is a blog post!  I know it has been a while but life has been chaotic.  But hey, you’re not here to read about what I’ve been busy with are you?  You’re here for the food!  Ahh food…I’ve been dieting so I’ve been having this love-hate relationship with food lately.  I’m genuinely trying to make healthier choices, which can be hard, but necessary.

Today’s recipe is a kind of take-out fake-out that takes the fake-out to the next level.  It’s a lo-mein stir fry recipe but instead of using noodles we are going to use shredded cabbage.  I know, it’s not quite the same thing but trust me, once you get used to these substitutions you actually start to enjoy them!  This recipe came together really quickly (cooking in the wok scares me because things cook SO quickly).  I actually used some leftover cooked chicken breasts that I just diced and didn’t cook as long as the recipe said.  It was good enough to bring me back to blogging after six months, the very night I made it.  Check it out!

Chicken Vegetable Lo Mein

Chicken and Vegetable ‘Lo Mein’
Recipe slightly adapted from:  Primal Palate

Ingredients:
Chicken, diced into bite-sized pieces1/4 cup almonds, chopped
1/2 cup water chesnuts
1/4 cup green onion, chopped
1 pkg shiitake mushrooms
1 stalk celery, chopped
1 tbsp minced ginger
1 tbsp minced garlic
2 cups broccoli (I used a ready to cook package and just used it all)
2 cups shredded cabbage (coleslaw mix works great – minus the dressing of course)
Sesame oil
Braggs Coconut aminos (a lower sodium natural choice instead of soy sauce – often found in the organic section or sometimes with the oriental food.  If you can’t find it then use a low-sodium soy sauce)
Toasted Sesame Seeds to top

Method:

Heat wok over high heat, add sesame oil and coat the pan.  Add the meat and cook for a few minutes, until mostly cooked (mine was already cooked so I didn’t cook as long).  Add the broccoli, water chestnuts, celery and shiitake mushrooms and cook for a couple of minutes.  Next add in the almonds, cabbage, ginger, green onions and garlic, along with 4 tbsp coconut aminos.  Mix well and cook for a few minutes, until the cabbage is tender but not TOO soft.  Remove from heat and top with sesame seeds.